Developing for Janssen Project#
Remote Debugging#
Janssen Server modules run as Java processes. Hence, like any other Java process
the JVM running the module can be configured to open a debug port where a remote
debugger can be attached. The steps below will show how to configure
auth-server module for remote debugging.
- Pass the command-line options to the JVM
On the Janssen Server host, open the service config file
/etc/default/jans-auth and add the following JVM parameters to as
JAVA_OPTIONS
-Xrunjdwp:transport=dt_socket,server=y,suspend=n,address=6001
6001 for the remote debugger. Any other port can
also be used based on availability.
-
Restart
jans-authservicessystemctl restart jans-auth.service -
Check if the port is open and accessible from within the Janssen Server host Use the
jdbtool from JDK to test if the JVM port has been openedif the port is open, it'll give you output like the below:./<path-to-JDK>/bin/jdb -attach 6001pressSet uncaught java.lang.Throwable Set deferred uncaught java.lang.Throwable Initializing jdb ... >ctrl+cto come out of it. -
Ensure that the port is accessible from outside the host VM as well and firewalls are configured accordingly
-
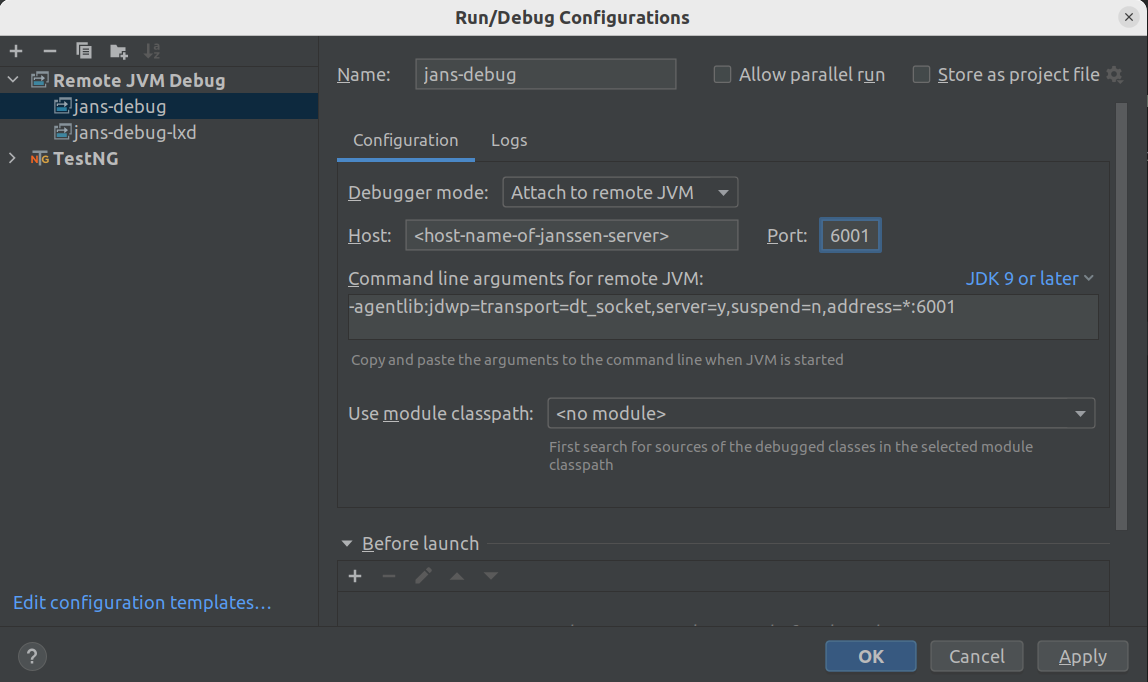
Connect to the remote port on the Janssen Server host from the developer workstation. Use any IDE (Intellij, Eclipse, etc.) to create and run a remote debugging profile. Provide IP and debug port of the Janssen Server host.
For IntelliJIdea, create a debug configuration as below:
Run Integration Tests with a Janssen Server VM#
In this guide, we will look at steps to run the Janssen integration test suite against an installed Janssen Server.
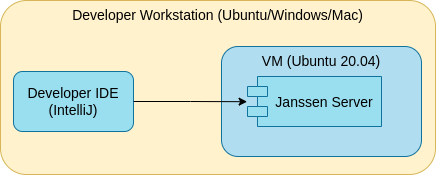
Component Setup#
Instructions in this guide can be used if Janssen Server is installed on a VM. Developers can use a virtualization software (like VMWare) or use LxD containers to create VM on developer workstation or use a remote cloud VM.
OS platform for Developer Workstation
Steps in this guide are applicable to any OS platform a Developer workstation may have. Example commands given in this guide are for Ubuntu Linux based workstation.
Install Janssen Server#
Install the Janssen server using one of the methods described in the VM installation guide. Note the points below when following installation instructions.
- Make a note
of the
host namethat you assign to the Janssen server during the installation. For this guide, the Janssen hostname would bejanssen.op.io - Choose to install with test data load. This can be achieved by using
the
-tswitch when invoking the setup script from installation instructions.
Use the VM installation guide for the complete set of instructions.
Once the installation is complete, check if the .well-known end-points of the
Janssen server from the browser. A successful response will ascertain that the
The Janssen server running inside the local VM is healthy and also accessible
from the developer's machine.
Note
Based on developer setup it may be necessary to add appropriate IP-HOST
mapping to the developer workstation. For instance, on a Linux-based
developer workstation, this means adding a mapping to /etc/hosts file.
Make sure that VM's IP is mapped to a FQDN like janssen.op.io. Refering
to VM with localhost or just IP will not work.
URI for OpenID configuration .well-known endpoint:
https://janssen.op.io/jans-auth/.well-known/openid-configuration
The response received should be JSON formatted Janssen configuration details, similar to those below.
{
"request_parameter_supported" : true,
"pushed_authorization_request_endpoint" : "https://janssen.op.io/jans-auth/restv1/par",
"introspection_endpoint" : "https://janssen.op.io/jans-auth/restv1/introspection",
"claims_parameter_supported" : false,
"issuer" : "https://janssen.op.io",
"userinfo_encryption_enc_values_supported" : [ "RSA1_5", "RSA-OAEP", "A128KW", "A256KW" ],
"id_token_encryption_enc_values_supported" : [ "A128CBC+HS256", "A256CBC+HS512", "A128GCM", "A256GCM" ],
"authorization_endpoint" : "https://janssen.op.io/jans-auth/restv1/authorize",
"service_documentation" : "http://jans.org/docs",
"authorization_encryption_alg_values_supported" : [ "RSA1_5", "RSA-OAEP", "A128KW", "A256KW" ],
"id_generation_endpoint" : "https://janssen.op.io/jans-auth/restv1/id",
"claims_supported" : [ "street_address", "country", "zoneinfo", "birthdate", "role", "gender", "user_name", "formatted", "phone_mobile_number", "preferred_username", "inum", "locale", "updated_at", "post_office_box", "nickname", "preferred_language", "email", "website", "email_verified", "profile", "locality", "room_number", "phone_number_verified", "given_name", "middle_name", "picture", "name", "phone_number", "postal_code", "region", "family_name", "jansAdminUIRole" ],
"scope_to_claims_mapping" : [ {
  "user_name" : [ "user_name" ]
}, {
  "https://jans.io/scim/users.write" : [ ]
}, {
  "https://jans.io/scim/groups.read" : [ ]
}, {
  "https://jans.io/scim/all-resources.search" : [ ]
}, {
  "https://jans.io/scim/fido.write" : [ ]
}, {
  "https://jans.io/scim/groups.write" : [ ]
}, {
  "https://jans.io/scim/fido2.read" : [ ]
}, {
  "https://jans.io/scim/fido.read" : [ ]
}, {
  "https://jans.io/scim/fido2.write" : [ ]
Setup The Certificates#
To run the tests against the installed Janssen Server, the workstation JRE needs to have the appropriate certificate installed. Update cacerts using the steps below:
-
extract certificate for Janssen server with name
janssen.op.ioOn Developer Workstationthis command takes a few seconds to return.openssl s_client -connect test.local.jans.io:443 2>&1 |sed -ne '/-BEGIN CERTIFICATE-/,/-END CERTIFICATE-/p' > /tmp/httpd.crt -
Update cacerts of your JRE which is being used by the code workspace. For example,
/usr/lib/jvm/java-11-amazon-corretto. When running the command below, it will prompt for cert store password. Provide the correct password. The default password ischangeit.keytool -import -alias janssen.op.io -keystore /usr/lib/jvm/java-11-amazon-corretto/lib/security/cacerts -file /tmp/httpd.crt
Configure developer workspace#
Now that we have Janssen Server running in a VM and it is accessible from the developer workstation as well, we will create and configure the code base on the developer workspace to run integration tests.
Get Janssen server code from Janssen GitHub repository. Note the path to this location, we will refer to it as source-base.
Janssen Server is composed of multiple modules. For example source-base/jans-auth-server, source-base/jans-link etc.
Each module has its own set of tests. Below are the instructions for configuring each module for tests.
What is a Profile directory?
- To run integration tests, the developer workspace needs to know details about he Janssen Server agaist which the tests are to be run.
- Janssen Server workspace holds this information in
source-base/module/sub-module/profilesdirectory. - The
profilesdirectory can contain one or more sub-directories, each representing a profile(i.e a target Janssen Server). These profile directories are used to hold files that contain important information required to run tests. - Developers can create one or more profiles and use them to run tests against different Janssen Servers.
- This guide uses Janssen Server hostname,
janssen.op.io, as profile name.
Configuring the jans-auth-server module#
Configuring jans-auth-server module involves setting up profiles for client,
server and agama sub-modules.
Follow the steps below to configure the profile for the client and server sub-modules.
- Move to the module directory
cd source-base/jans-auth-server -
As a precautionary measure, let's first remove any old profile artifacts from the
jans-auth-serverworkspace.rm -rf ./jans-auth rm -rf ./client/profiles/janssen.op.io rm -rf ./server/profiles/janssen.op.io rm -rf ./agama/engine/profiles/janssen.op.io -
Since Janssen Server has been installed with test data, the installer also created the profile files required to run the test. These files are kept on the VM under
/opt/jans/jans-setup/output/test/jans-authdirectory. Copy overjans-authdirectory from Janssen Server VM tosource-base/jans-auth-serveron developer workstation. - Create new profile directories.
mkdir -p ./client/profiles/janssen.op.io mkdir -p ./server/profiles/janssen.op.io mkdir -p ./agama/engine/profiles/janssen.op.io - Copy the contents of
jans-authdirectory into the respective sub-module'sjanssen.op.ioprofile directorycp ./jans-auth/client/* ./client/profiles/janssen.op.io cp ./jans-auth/server/* ./server/profiles/janssen.op.io cp ./jans-auth/config-agama-test.properties ./agama/engine/profiles/janssen.op.io/config-agama-test.properties - Copy keystore file
profiles/default/client_keystore.p12fromdefaultprofile directory to thejanssen.op.ioprofile directorycp -f ./client/profiles/default/client_keystore.p12 ./client/profiles/janssen.op.io cp -f ./server/profiles/default/client_keystore.p12 ./server/profiles/janssen.op.io
Running The Tests#
Each module in Janssen Server has its tests that have to be executed separately.
For example, to run integration tests for jans-auth-server module, run the
following maven command at the directory level:
mvn -Dcfg=janssen.op.io test
Configuring the jans-core module#
This module does not require a profile setup. It can be built with below maven command.
mvn clean compile install
Configuring the jans-link module#
This module does not require a profile setup. It can be built with the below maven command.
mvn clean compile install
Configuring the jans-orm module#
This module does not require a profile setup. It can be built with the below maven command.
mvn clean compile install
Configuring the agama module#
This module does not require a profile setup. It can be built with the below maven command.
mvn clean compile install
Configuring the SCIM module#
This module does not require a profile setup. It can be built with the below maven command.
Profile setup for client and server modules#
Many Janssen Server modules and sub-modules use test configuration stored in a
directory named profile. The profile
directory contains files that hold important information required to run tests.
Developers can create one or more
profiles and use them to run tests against different Janssen Servers.
Since Janssen Server has been installed with test data, the installer also
created the profile files required to run
the test.
For SCIM/client module, these files are kept on the VM under
/opt/jans/jans-setup/output/test/scim-client directory. Copy over this directory
to any location on the developer workstation.
Follow the steps below to configure the profile for the client module. The same steps should be followed for setting up a profile for the server module.
- Under
jans-scim/client/profilesdirectory, create a new directory and name itjanssen.op.io - Copy the contents of
scim-client/clientdirectory into the newly createdjanssen.op.iodirectory
Post this, remove the scim-client directory.
Now as the profile is setup, to build the jans-scim module and run tests,
use the command below:
mvn -Dcfg=janssen.op.io test
Setup Janssen Schema with Test data#
Useful Tools#
While working with Janssen Server, either as developer or administrator, following tools can come in handy.
Created: 2022-05-18
