Inbound SAML
Overview#
Janssen supports authentication against external SAML identity provider (IDP) namely inbound SAML/inbound identity. This document provides instructions for configuring Janssen server
Enable inbound SAML#
Make sure you have Janssen server with SAML plugin installed and enabled. SAML plugin can be enabled using TUI (Jans Saml -> Contribution)
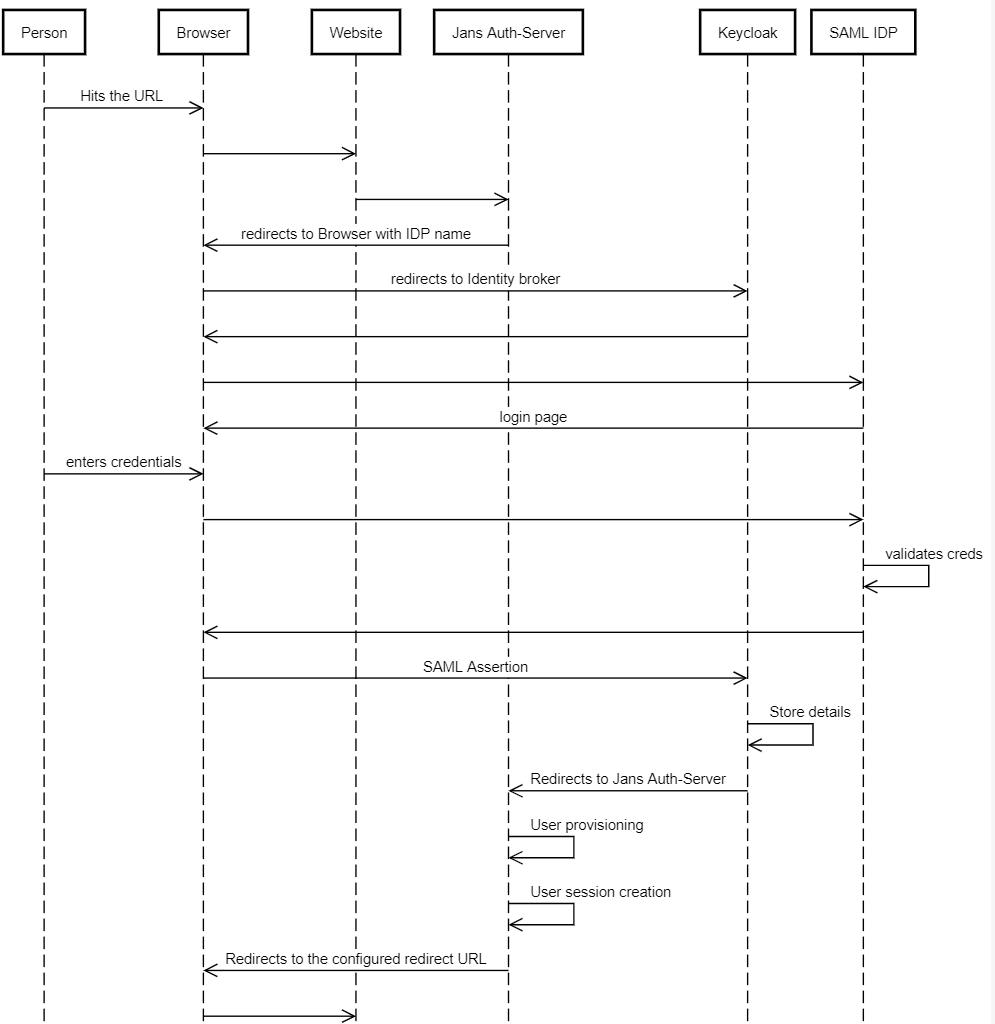
Inbound SAML Authentication Flow#
The following is a high-level diagram depicting a typical inbound identity user authentication and provisioning workflow.
Configure SAML IDP#
Use Janssen Text-based UI(TUI) or Janssen command-line interface to create new IDP Keycloak Server. 1. Navigate to Inbound SAML
-
Click on
Add IDP -
Enter a name (unique identifier) for this provider (letters, digits, and underscore characters allowed).
-
Enter a display name for the IDP
-
Upload IDP Metadata using
Import Metadata from File. -
Optionally provide individual metadata elements.
-
Save details
SAML IDP is created in Keycloak server under default realm ,jans-api. IDP details are also persisted in Jans DB.
Configure IDP for inbound SAML#
- SAML IDP should have been configured as stated in above
- Use Agama Lab is an online visual editor to build authentication flows. Learn more about Agama Lab
- Fork existing agama-inbound-saml project from Agama Lab Projects
- In Agama orchestrator create a new flow by adding a RFAC (Redirect and fetch a callback) node for SAML IDP.
- Deploying .gama package on Janssen Server
- Testing the authentication flow using Jans Tarp.
- Install Tarp, check details here.
- Open Tarp extension.
- Enter URL of Keycloak OpenID configuration. Example http:///realms/keycloak-external-broker/.well-known/openid-configuration.
- Click Register.
- Registered Client details are displayed, enter Additional Params to hint Keycloak about IDP to be trigger. Example {"kc_idp_hint":"gluu-saml-idp-1"}
- Click "Trigger Auth Code Flow.
- This should redirect to IDP login page.
- Enter user details and login.
Created: 2022-07-21
