Quick Start Using Agama Lab#
In this quick start guide, we will build, deploy and test a simple password-based authentication flow using Agama and Agama Lab.
Agama Lab is an online visual editor to build authentication flows. A flow
built on Agama Lab is packaged as a .gama project file. .gama package needs to be manually deployed on
Janssen Server where the Agama engine will execute the flow when an authentication request is received.
Major Steps involved in this process are:
- Create Agama project using Agama Lab
- Deploying
.gamapackage on Janssen Server - Testing the authentication flow
This guide covers these steps in the following sections.
Prerequisites#
- Janssen Server instance
- A public GitHub repository with at least one prior commit
Create Agama Project#
We will use Agama Lab to create a simple username-password based user authentication flow. This involves defining the authentication steps, designing the user interface to capture user inputs, and lastly, releasing the flow as an Agama project.
Defining The Authentication Flow#
Log Into Agama Lab#
-
Go to Agama Lab login page.

-
Authenticate on the GitHub authentication page.

-
Input the name of the repository where Agama Lab should release the project artifacts. Click
Next
-
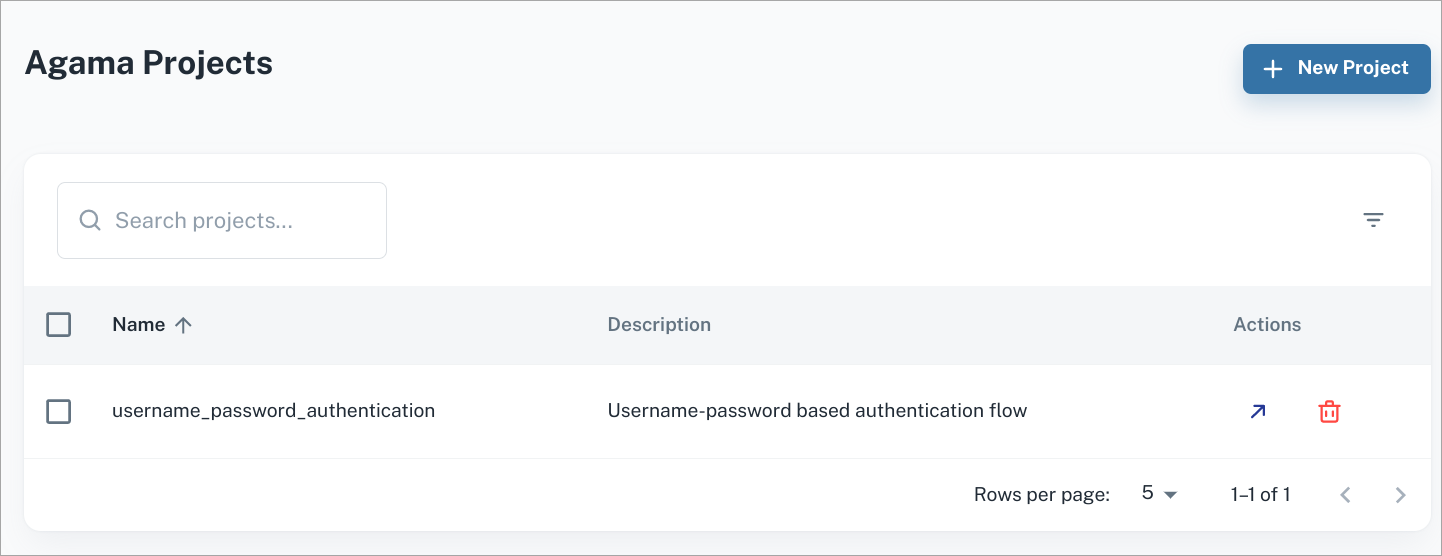
Project listing page will be shown. All the existing projects for your GitHub user are listed here. Projects can be created, edited, and deleted from the project listing page.

Create A New Project#
-
To create a new project, click on the
New Projectbutton on the project listing page above. Enter the name and the description for the new project and click theCreatebutton.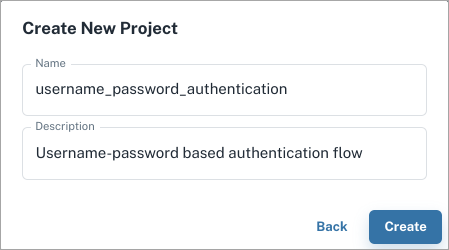
-
This will create a new project and it'll be listed on the project listing page.
Create The Authentication Flow#
-
Create A Flow File
Click on
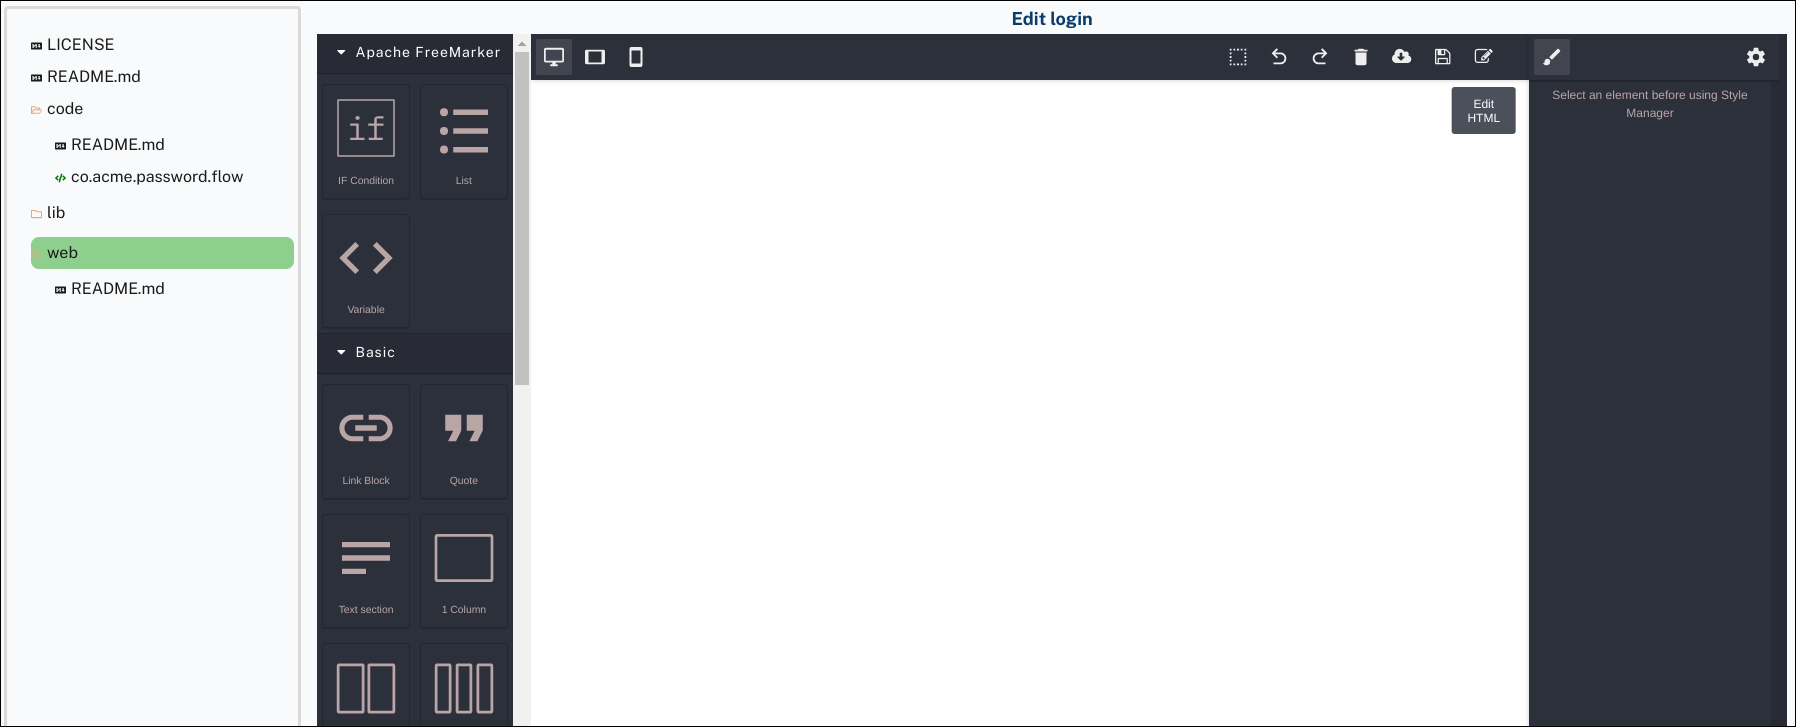
The flow authoring view will open with a blank canvas. To start creating the flow, we need to create a
Flow File. To do that,Right-click on
codeand then selectNew>Flow File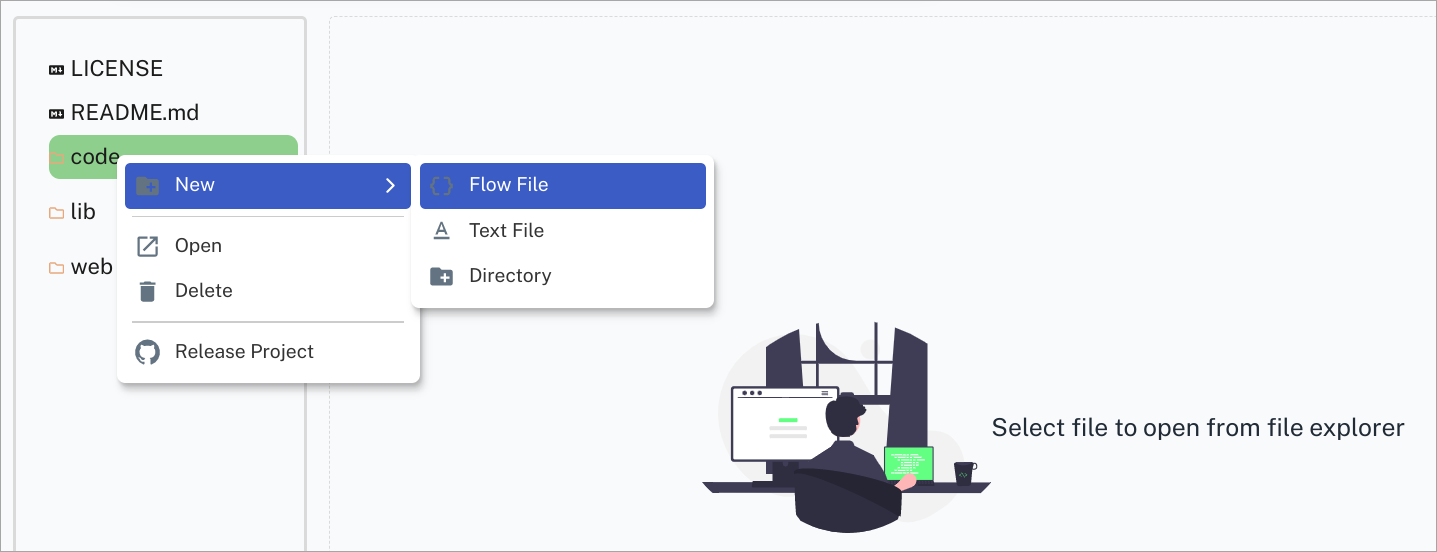
Give name and description for the flow file and then click
Create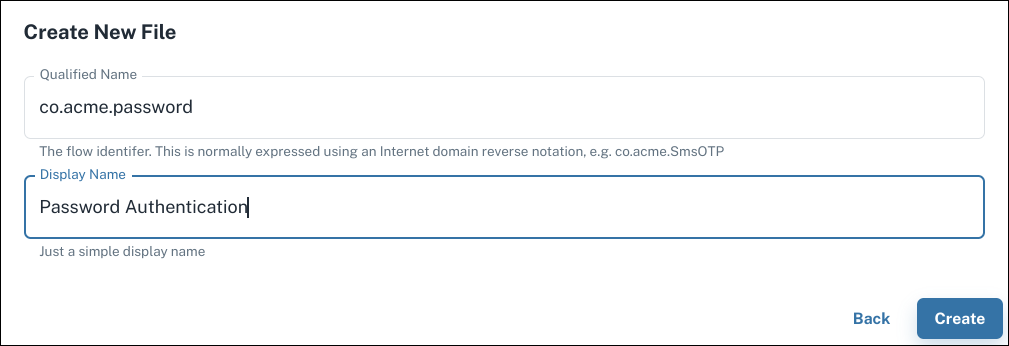
A newly created flow file has one block in it by default.

Clicking on the block will allow you to add further blocks using or to edit the existing block using .
-
Create AuthenticationService Call block
Click on the block and then . Then select
call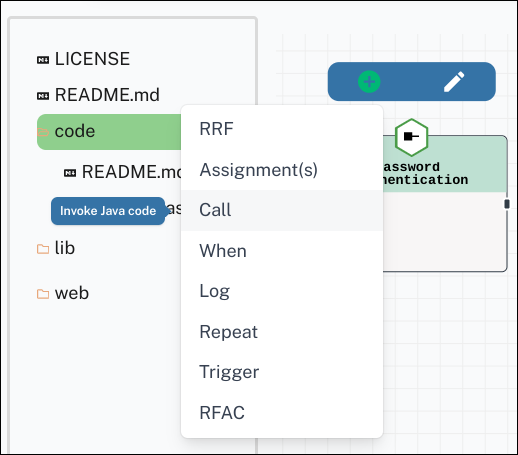
A new
Callblock should appear with a link toStartblock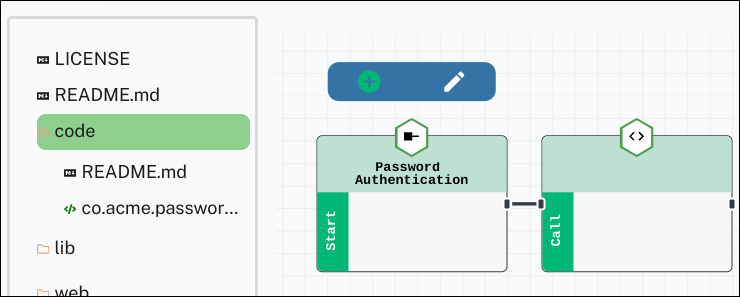
Click
Callblock and then click to open the configuration screen.Add configuration values as shown below.
This will create a new instance of
AuthenticationServiceclass. This instance will be used to authenticate the user. The new instance will be stored in a variable calledauthService.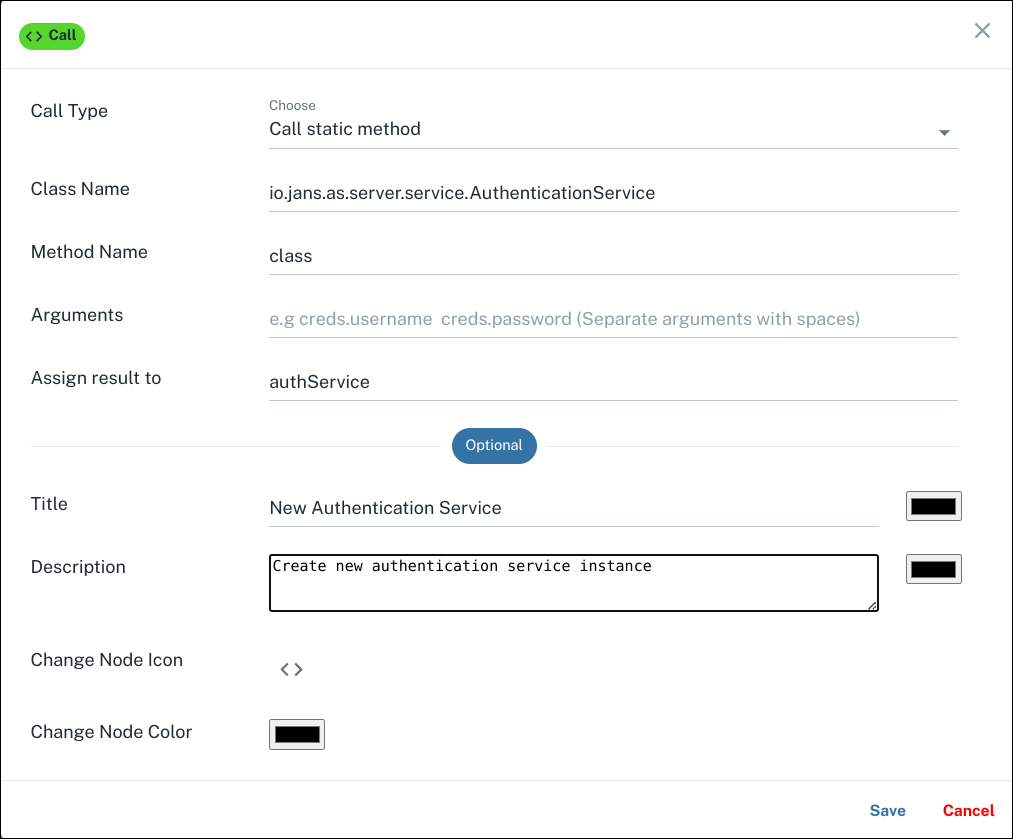
-
Create CdiUtil Call block
To perform authentication we will also need a bean instance of
CdiUtilclass. This bean instance
takesAuthenticationServiceinstance that we created in the previous step as an argument.Click the
New Authentication Serviceblock and then click on . Then clickCall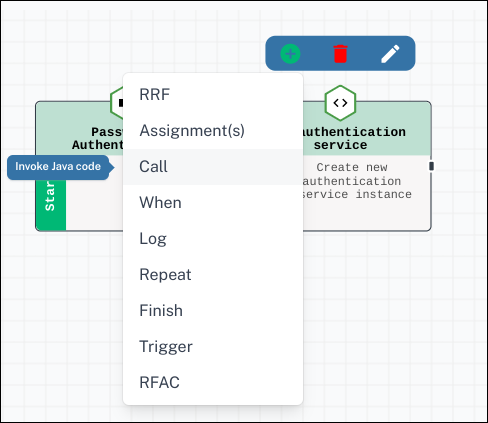
Click on the newly created
Callblock and by clicking open the configuration page. Input values as shown below in the configuration screen
-
Create Assignment(s) block
Next, we need to create an empty variable that the flow will use in the future to store authentication results.
Click on
New CdiUtil Objectand then click . SelectAssignment(s)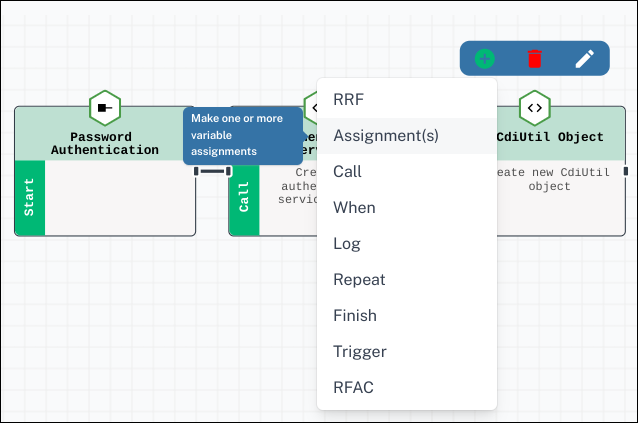
Click on the newly created
Assignblock. Click . Input values as shown below in the configuration screen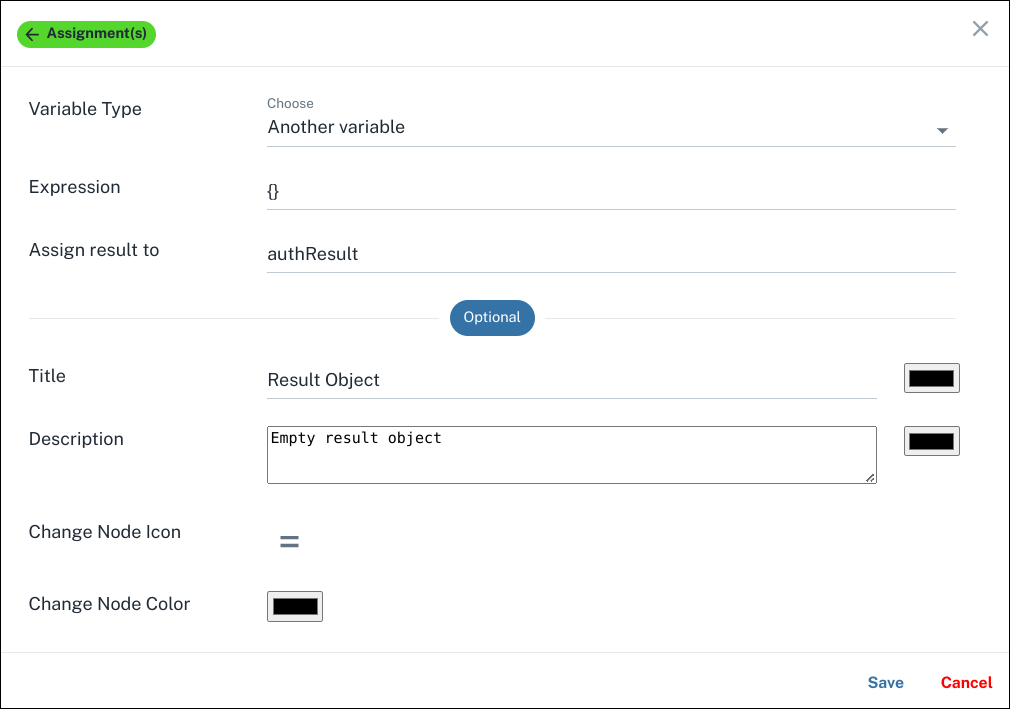
-
Create repeat block
Repeatblock represents the Repeat instruction of Agama DSL.Repeat block creates a loop to iterate over certain steps(blocks). We will create a repeat loop that allows 3 retries if the authentication fails.
Click on the
Result Objectblock and then click . SelectRepeat.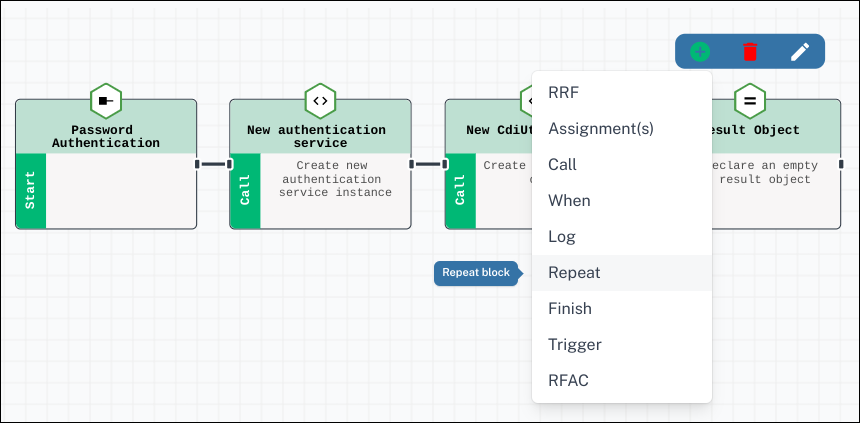
Click on the newly created
Repeatblock. Click . Input values as shown below in the configuration screen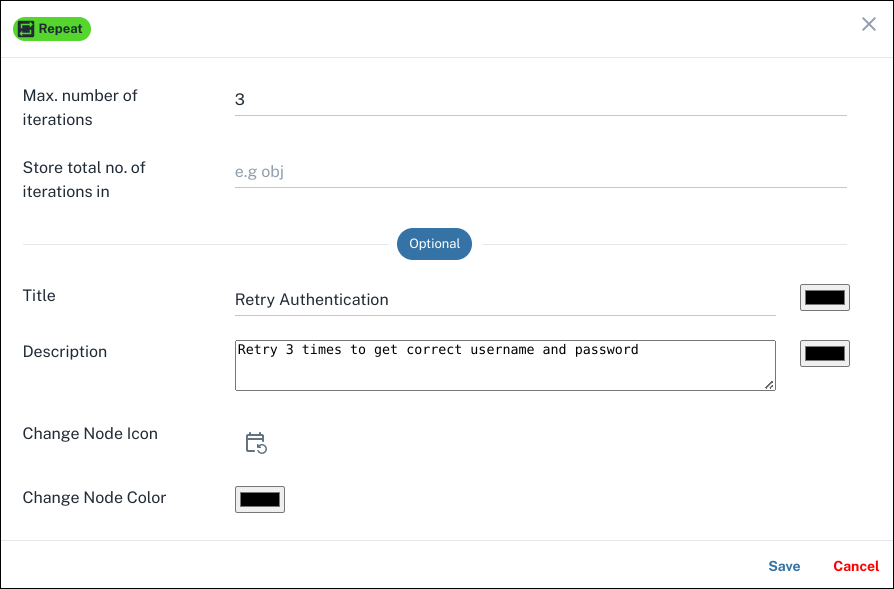
-
Create An RRF block
RRFblock represents the RRF instruction of Agama DSL.Click on the
Repeatblock. Click . Check theIn Repeat Blockand then click onRRF.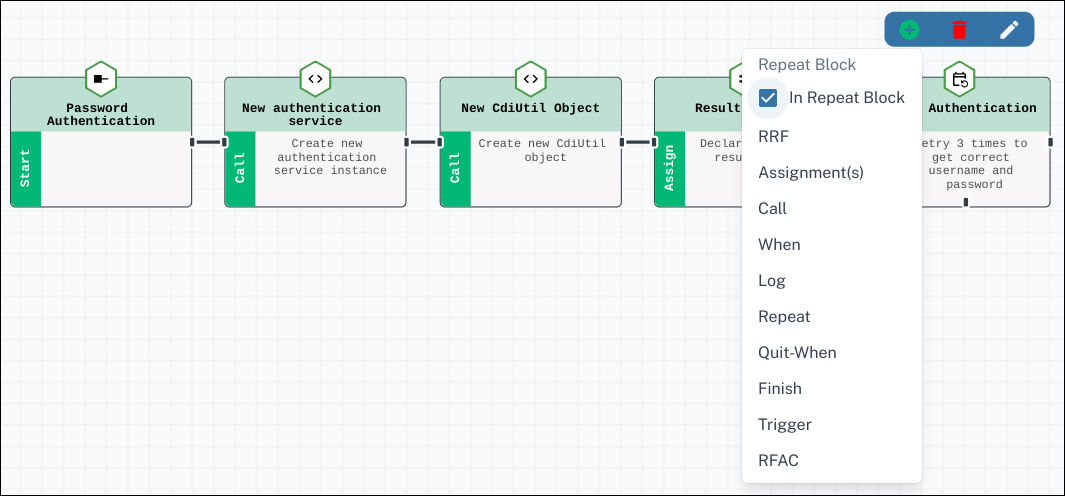
Click on the newly created
Repeatblock. Click . Input values as shown below in the configuration screen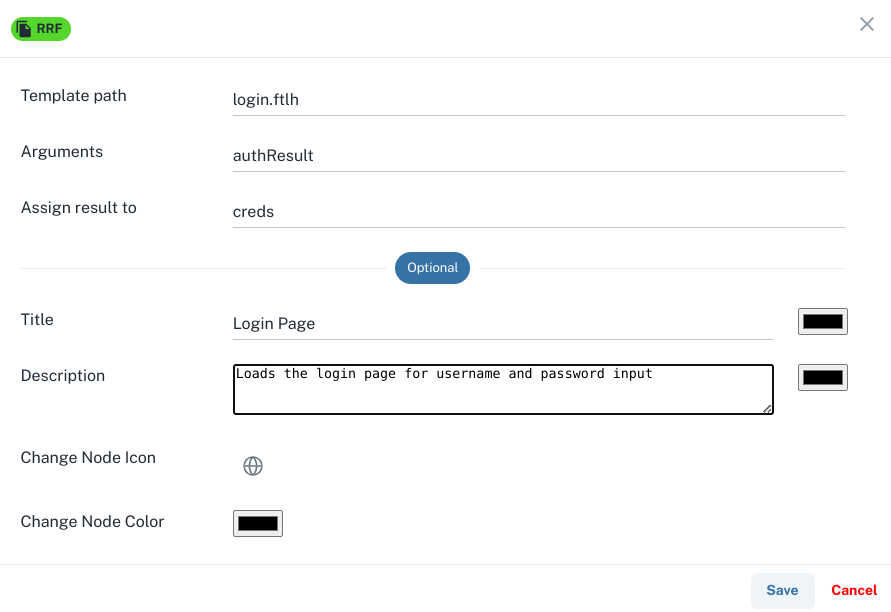
Since we have checked the
In Repeat Blockat the time of adding theRRFblock, theRRFblock as well as all the blocks that we add to theRRFblock iterated blocks.At this stage, let's save the flow. Click
Saveon the flow canvas. -
Create a CdiUtil Call block
Create a
Callblock to process the username and password received from the user (in RRF) and validate them. The result of validation should be stored in a variable.Click on the
RRFblock. Click . Click onCall.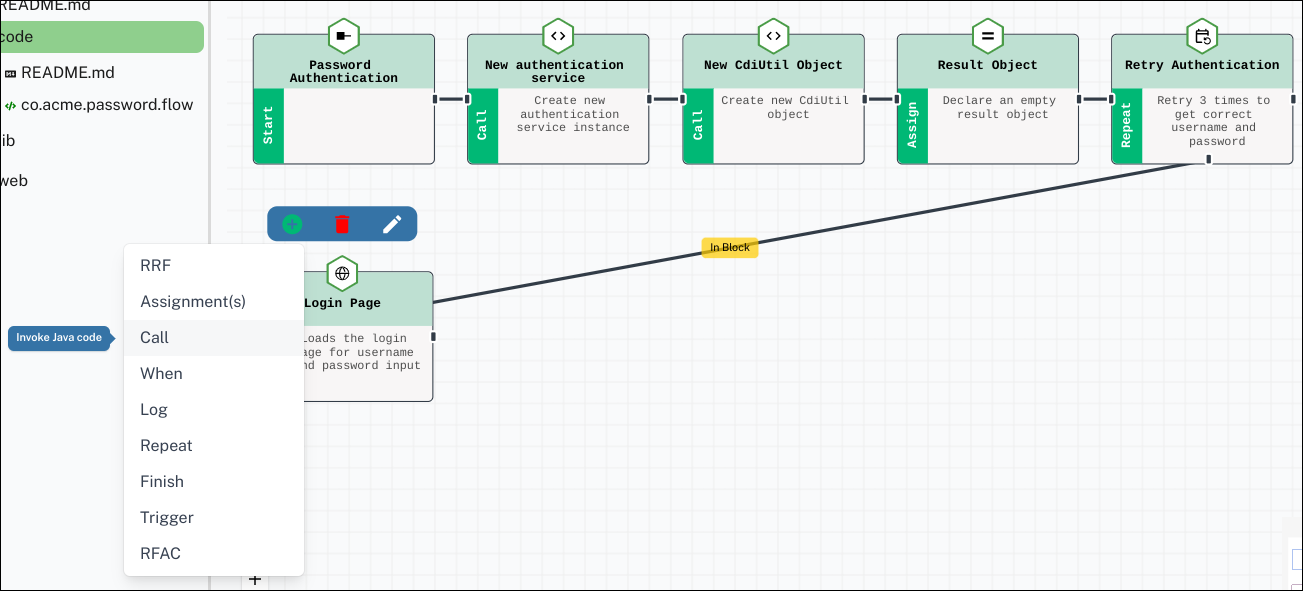
Click on the newly created
Callblock. Click . Input values as shown below in the configuration screen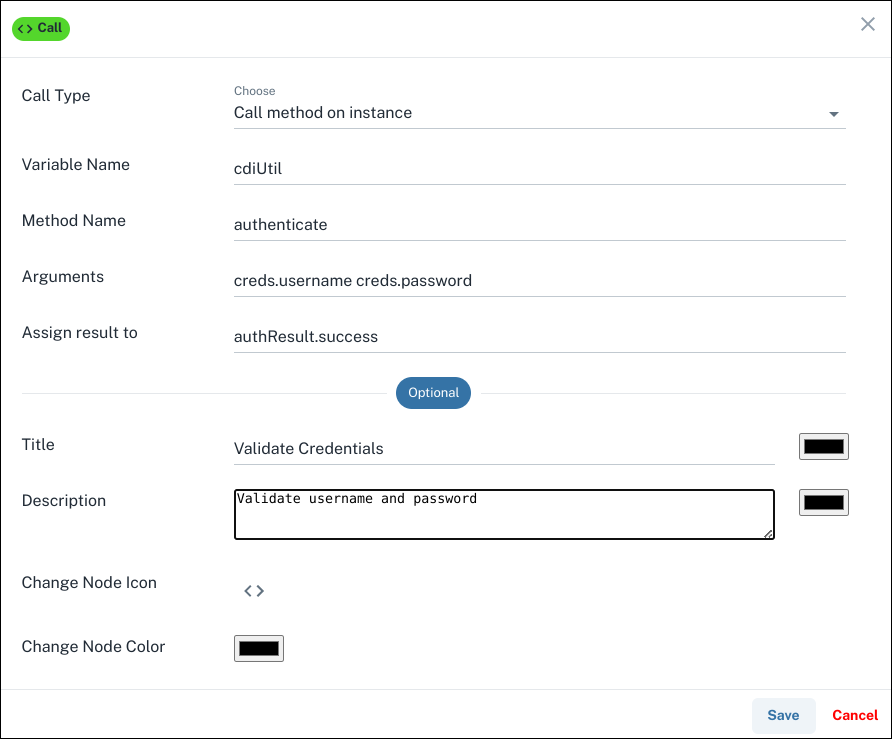
-
Create An Assignment block
In case of authentication failure, we want to show the username to the user while reentering the password on the web page. For this, we will save the username in a variable using the
Assignment(s)block.Click on the
Callblock. Click . Click onAssignment(s).
Click on the newly created
Callblock. Click . Input values as shown below in the configuration screen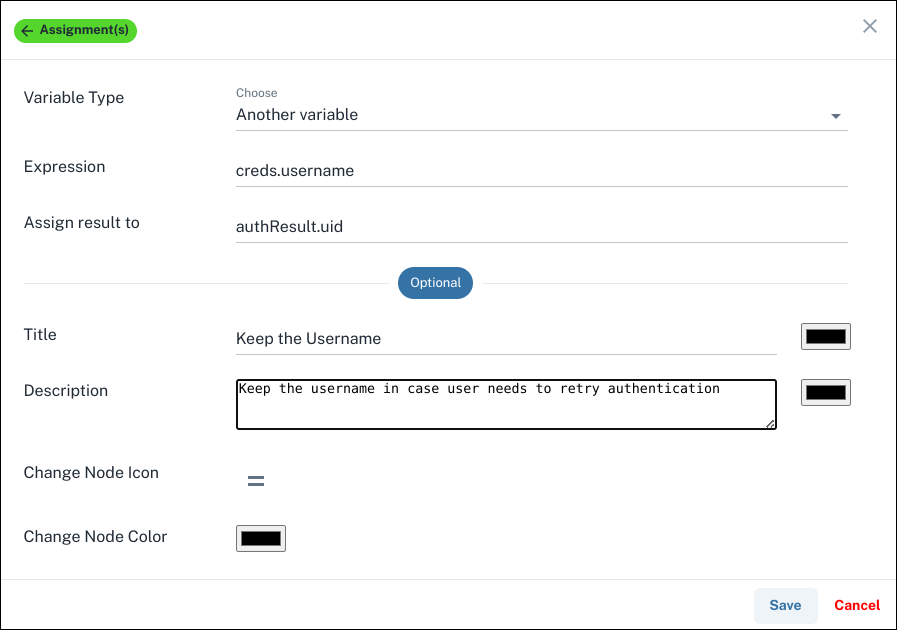
-
Create A Conditional When block
Whenblock represents the When instruction of Agama DSL.Create a conditional check using the
Whenblock to check if the authentication (validated invalidate credentialsblock) has been successful.Click on
Assignment(s)block. Click . Click onWhen.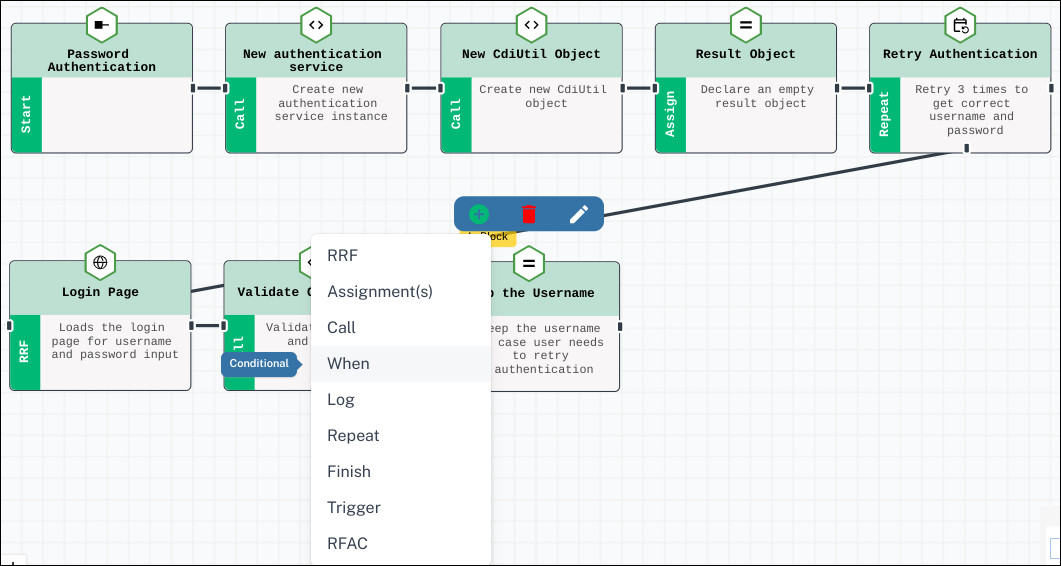
Click on the newly created
Whenblock. Click . Input values as shown below in the configuration screen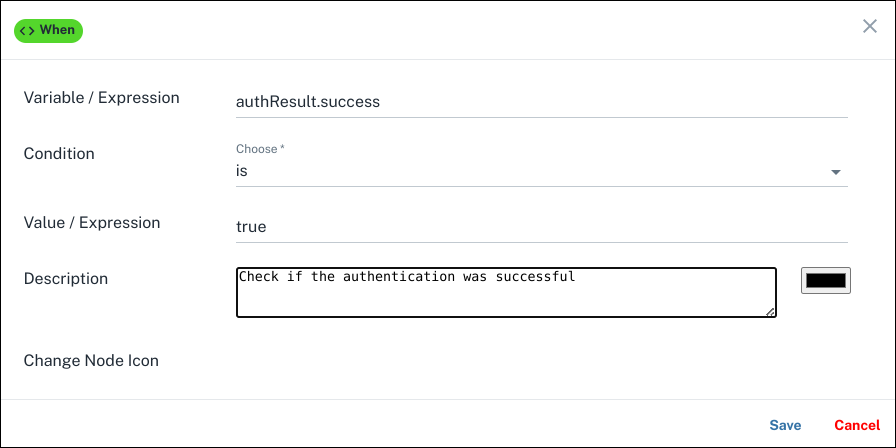
-
Create finish blocks
The
Finishblock represents the Flow finish instruction of Agama DSL.If the authentication was successful then the flow should finish and return the username. This will be achieved by adding a Finish block to the
Whenblock. And if authentication fails after 3 attempts, we need anotherFinishblock following theRepeatblock.Click on the
Whenblock. Click . Click onCondition metand then clickFinish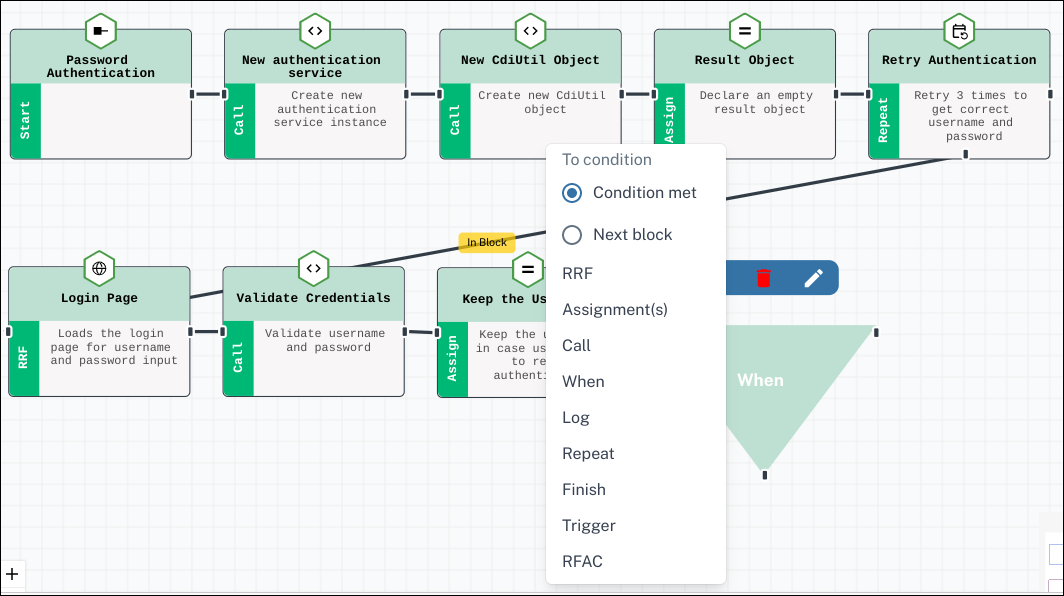
Click on the newly created
Finishblock. Click . Input values as shown below in the configuration screen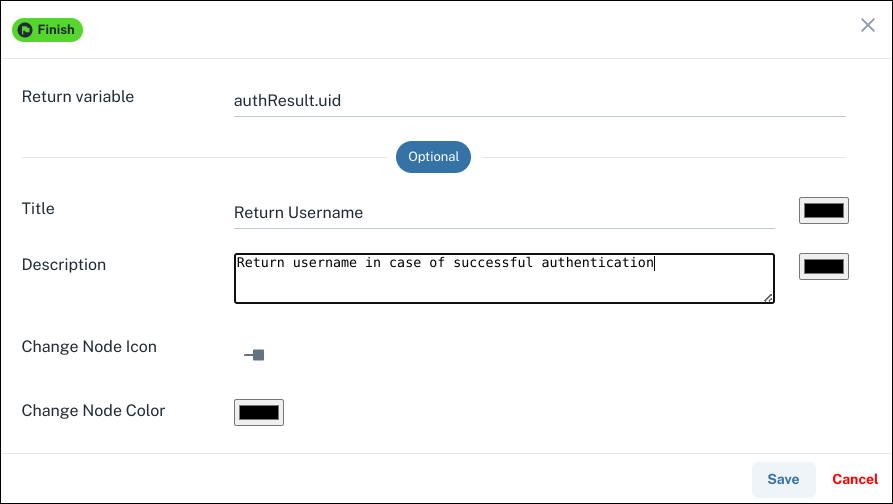
Click on the
Repeatblock. Click . ClickFinish
Click on the newly created
Finishblock. Click . Input values as shown below in the configuration screen and clickSave.
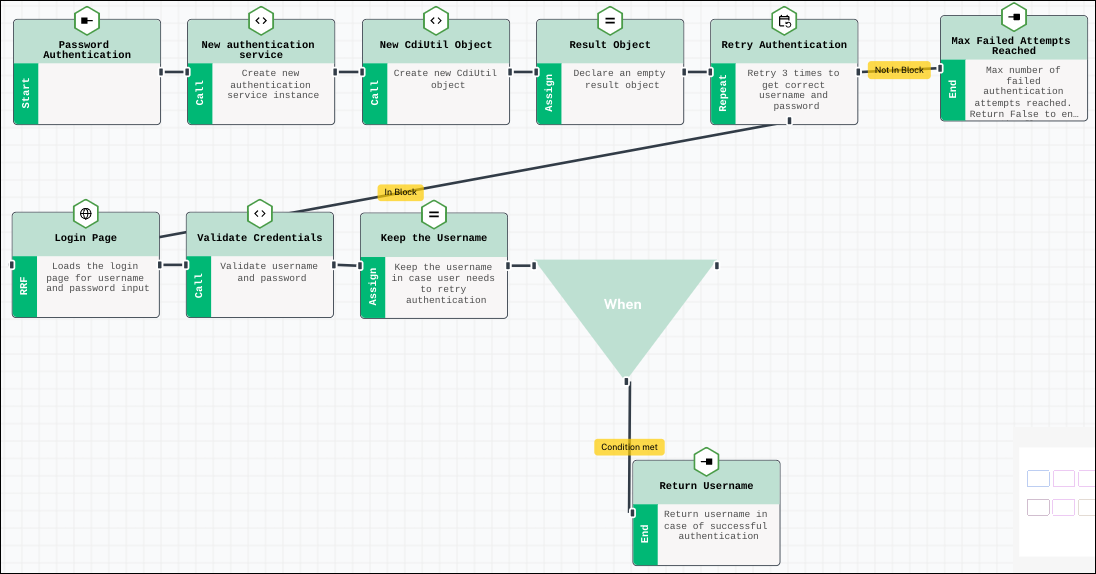
Save the flow using the
Savebutton on flow canvas.The completed flow looks like below:
-
Check Generated code
Agama Lab flow gets translated in Agama DSL. Click the
Codebutton to see the code generated by the flow.Flow co.acme.password Basepath "" authService = Call io.jans.as.server.service.AuthenticationService#class cdiUtil = Call io.jans.service.cdi.util.CdiUtil#bean authService authResult = {} Repeat 3 times max creds = RRF "login.ftlh" authResult authResult.success = Call cdiUtil authenticate creds.username creds.password authResult.uid = creds.username When authResult.success is true Finish authResult.uid Finish false
Design User Interface#
In the RRF configuration step, we mentioned login.ftlh to render the login page elements.
We need to add login.ftlh to the Agama project so that the flow can use during the flow execution.
Use the steps below to create the page.
-
Create a template file
On the left project explorer menu, click on
web>New>Freemarker Template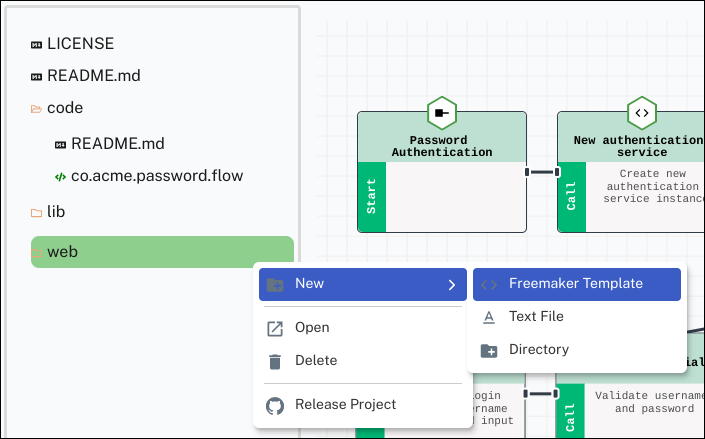
Select
+ Createunder theNew Blank Template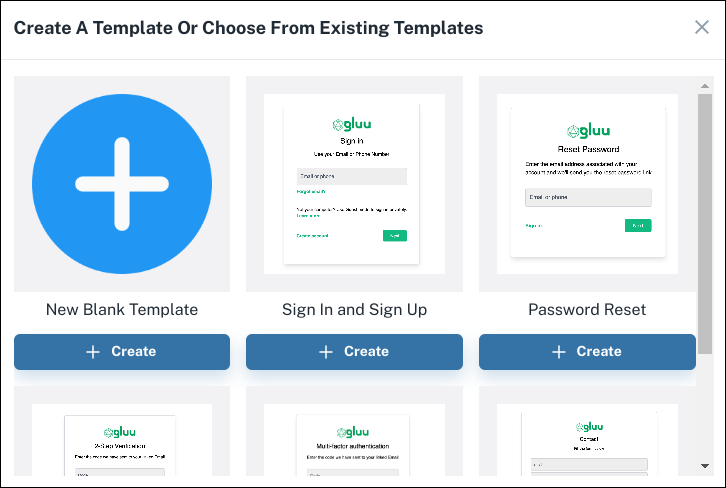
Give
NameandDescriptionas shown below and clickCreate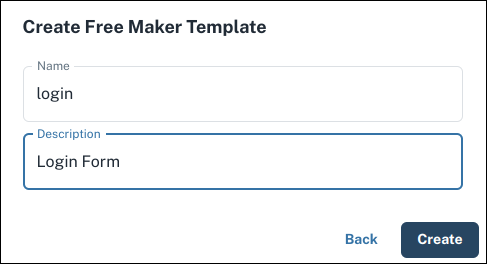
-
Use the visual editor
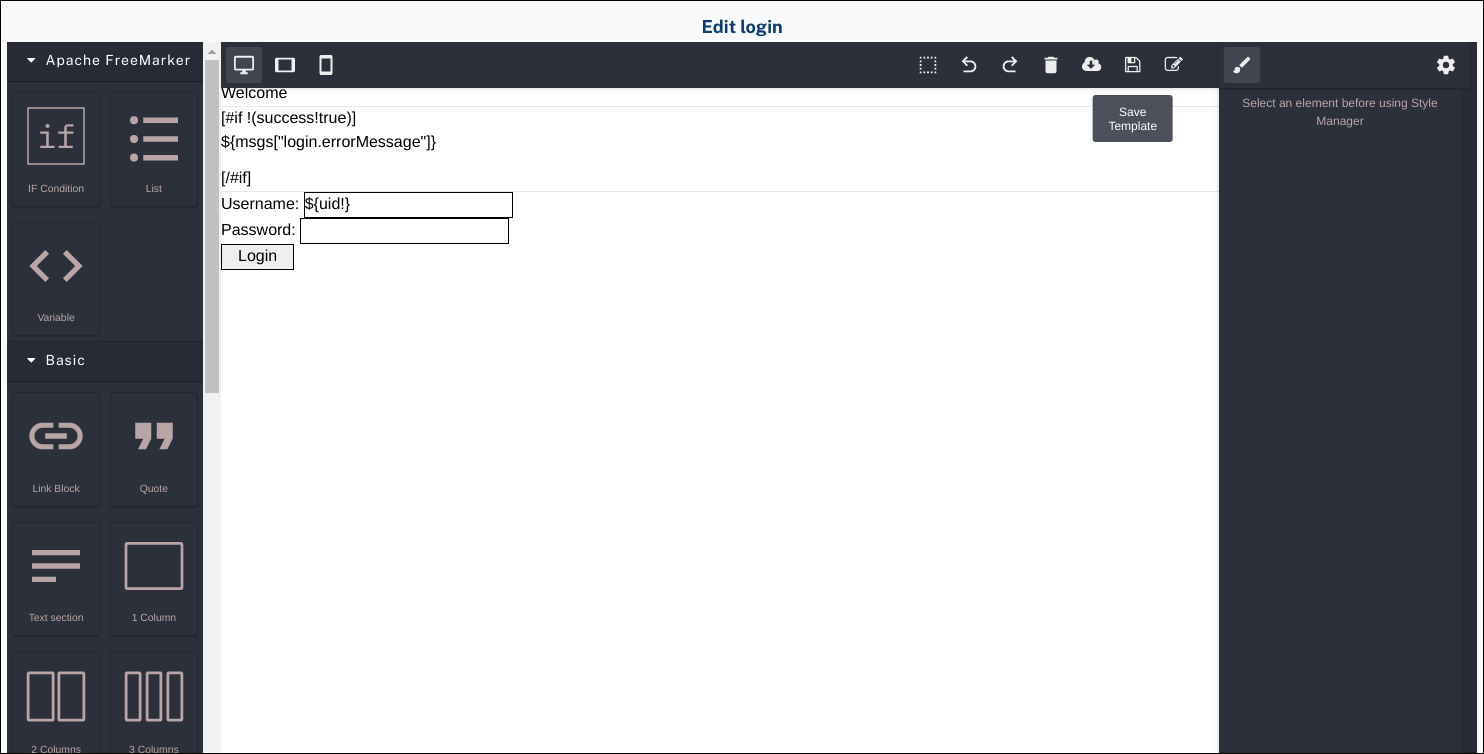
This opens a visual editor to create a freemarker template. Use this visual editor to create a template as per the need. For this article, we will use the code below.
Click
Edit HTML. This opens a text editor. Remove existing code in the editor and paste the code shown below.<!doctype html> <html xmlns="http://www.w3.org/1999/xhtml"> <head> <title> Jans Agama Basic Auth flow </title> </head> <body> <h2>Welcome</h2> <hr /> [#if !(success!true)] <p class="fs-6 text-danger mb-3">${msgs["login.errorMessage"]}</p> [/#if] <hr /> <form method="post" enctype="application/x-www-form-urlencoded"> <div> Username: <input type="text" class="form-control" name="username" id="username" value="${uid!}" required> </div> <div> Password: <input type="password" class="form-control" id="password" name="password"> </div> <div> <input type="submit" class="btn btn-success px-4" value="Login"> </div> </form> </body> <style> input { border: 1px solid #000000; } </style> </html>Click
Save changes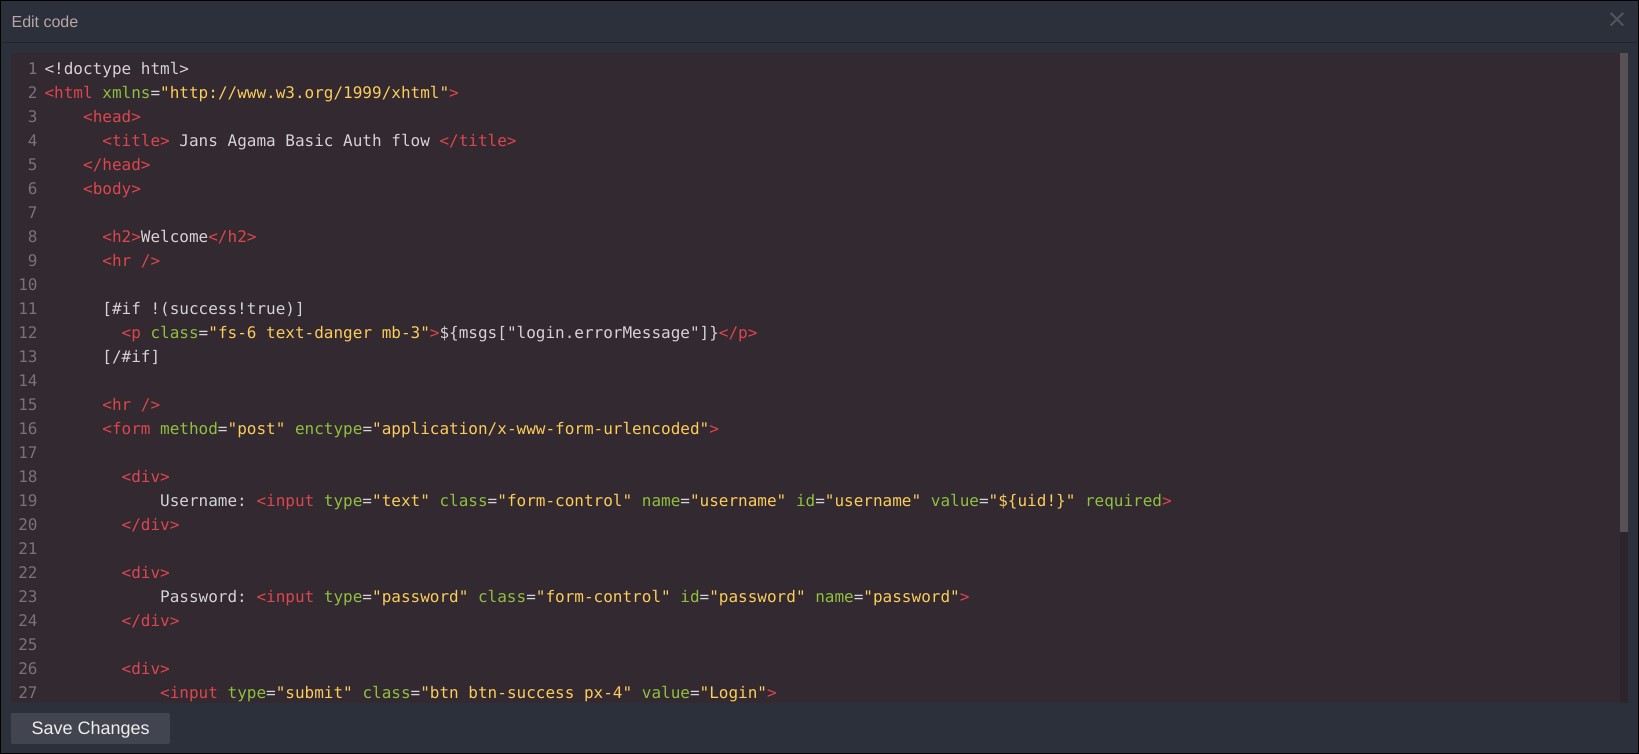
This will render the page in the visual editor.
Release The Project#
To use the flow for authentication in the Janssen Server, the flow needs to be released. Agama Lab
releases the flow and the related artifacts (like template) in the form of a .gama file in the GitHub repository.
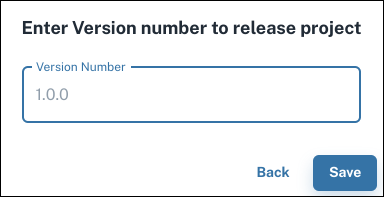
To release the project, click on any of the files in the left project explorer, and click Release Project.

Enter a desired version number and click Save
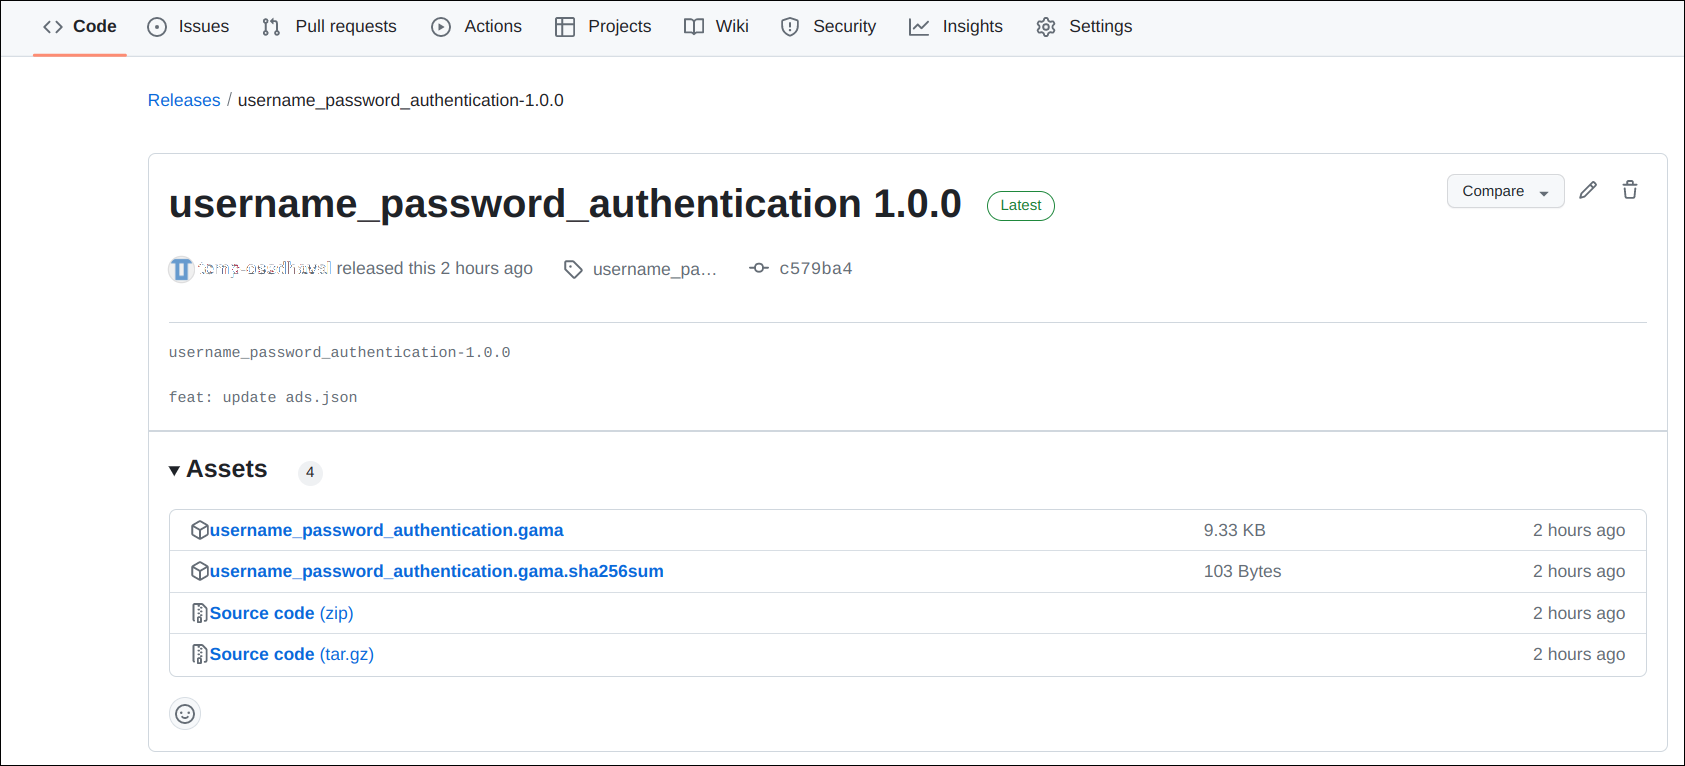
Upon successful release, Agama Lab Releases dashboard is shown. It lists all projects that are released.
Click on the project name to go to the GitHub repository release page where .gama file has been released

Download the .gama file from here to deploy on to the Janssen Server.
Deploy Agama Project#
Note
Please ensure that Agama engine and scripts are enabled in Janssen Server deployment
- Download the
.gamafile from the GitHub repository -
Open TUI using following commands on Janssen Server
cd /opt/jans/jans-cli python3 jans_cli_tui.py -
Navigate to
Auth Server>Agama>Upload Project. Select the.gamafile to upload.
Test#
- Setup Janssen Tent
-
Change the configuration as given below in
config.pyACR_VALUES = "agama_co.acme.password.flow" -
Run the Tent test by accessing it via the browser
Created: 2023-05-05
